Sea Fans - Tutorial


As promised, here are the steps for framing the sea fans.  I started with fans.  If you would like some of your very own click here.  Then, I picked up two square shadow box Ribba frames in white from IKEA.  Yes, I said IKEA.  I already had the linen, but you can pick up a yard or so from any fabric store.  In addition to these supplies, you will also need: scissors, exacto knife (box cutter), self adhesive fabric spray, a staple gun, monofilament thread, a needle, a drill, four popsicle sticks (just wait, I'll explain) and thick brown all purpose paper.

Step One
Measure your sea fans and determine the best placement of them in your frame.  Mark this spot on the backing board (which is provided with the Ribba frame).

Using your drill, make a small hole going all the way through the backing board.  You will also want to make a second hole in the backing board at the point where the base or root of the sea fan will rest.    

Step Two
Measure and cut your linen one inch larger than the backing board all the way around.


Step Three
This is very important (I did not do this on the first one and had to go back and redo it).  Secure the brackets and hanging wire onto the backing board (using the instructions provided with the IKEA frame).  

Step Four
Spray the backing board with the self adhesive spray and cover with the linen.  This will cover the fronts of the hanging brackets so they are not see in the final product.  


Step Five
Flip the board over and re-enforce with staples to secure the linen to the board.  This will prevent the fabric from drooping from the weight of the sea fans in the final product.


Step Six
Using the needle and monofilament thread, push the needle through the back and around the sea fan to secure it to the board.
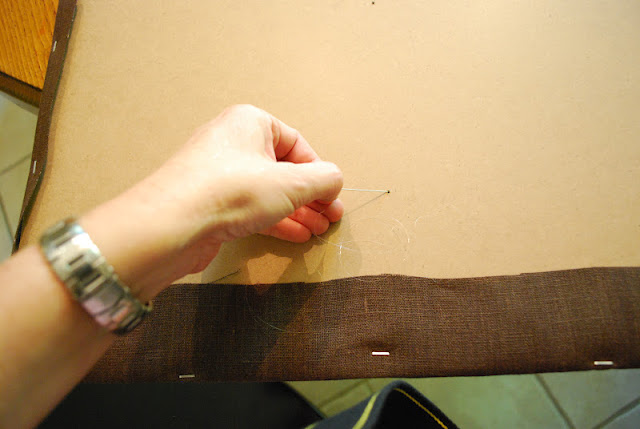
You are basically sewing the sea fan to the linen.

 I looped it through the backing board and around the sea fans three times.  I did this for for the top and bottom holes I drilled in the backing.

Step Seven
Once you have loop it through several times, place a popsicle stick over the drilled hole on the back and tie off the thread securing the popsicle stick.  This will act as a support for the sea fan and prevent it from drooping in the final product. 

Step Eight
Remove the mat provided with the frame (you will not need it for this project) and place the backing board in place in the frame and bend the dark metal braces back in place to secure the backing into the frame. 

Step Nine 
Using thick brown paper and double stick tape, finish off the backs of the frames for a professional look. 

And that is it!  I know it sounds like a lot of steps, but they are all very easy.  It took me about 20 minutes start to finish.  No waiting around for glue to dry like with the intaglio project!  

Now, it's your turn.  I would love to see pictures of your finished project.  M.


Dear readers,
It has been a while since last time.....I do like to share with you some pictures of the showroom as we rearranged some furniture and decorations last week. Some of them are new pieces as you will see. For this season we opted for a range of nice pale green and linen tones...
Hope you enjoy the inspiration...

Sabine
XXX


Paint Trick - Creating a Focal Point

Last week, I helped a client with exterior paint colors for her very cute house.  While I did not take pictures of her house (sorry, sometimes, I get so busy with the task at hand I forget to snap a picture), we did come up with a beautiful schedule. 

The house is a ranch style combination of brick and sliding.  Also, the front door is set back into a covered area.  The current dark color on her front door makes the entire entry way blend into the house and go completely away.  

To make things even more interesting, the client has a bit of a dilemma - she really wants to paint the entire house (brick and siding), but it's cost prohibitive at the moment.  The siding and shutters are in need of painting, so they must be done now.  Also, her brick is a bit tricky.  It tends to make any beige/neutral turn peachy.

  So, we came up a plan she could implement in stages.  First, we selected a color for the siding and shutters.  We selected colors that work with the brick color but could be used (at a later date) as a whole house color, should she decide to paint the brick.

For the siding, we pulled BM - Sag Harbor Grey.  It has just enough grey to hold it's own next to the brick (no peachy here!).

For the shutters, BM - Dragon's Breath.  It's one of my favorite go to colors for shutters.  It is dark, but yet soft and sophisticated.  Just perfect for most applications where you need a black.  Also, in our case, the roof has a lot of brown, so a stark black (like BM Black Jack) would not have worked.


  Lastly, we selected a bright fun color for her front door.  Yelp.  That would be yellow.  This will brighten up the dark covered area and draw your eye to the entryway of her home (which, btw, is lovely and should be highlighted). 

BM - Sunbeam

Now, I know what you're thinking?!  Don't be afraid.  What sounds crazy, does not look crazy.  I promise. Here are a few inspiration images to give you the idea.


This is very modern home which looks nothing like my client's house; but the front door is set back in a dark alcove like that of my client's.  Notice how the bright color works to lighten that spot and makes the front door pop.  This is the idea. 


Here is another example of a front door that gets lost without a pop of color.  Yellow does the trick to instantly make it the focal point.

I'm not suggesting that every house needs a yellow door.  But in some cases, it's just what the doctor ordered.  Especially, if you want to make a house sing!  M.


Sea Fans

With my kiddos away for the week, I've had some time to focus on interior design, both for clients and my own house.  If you recall, I purchased some sea fans a couple of months ago during a girls beach weekend.  I finally took the time to frame them.  Wooo Hooo! 
(I think I should have been taking a photography class instead of framing these.  The wall color looks totally green in this image - they are not green! Rather Grant Beige - not sure why I can't seem to capture it).  
Here's the color:


Sorry to completely digress.  At any rate, I decided to use two of the fans (rather than three) stacked vertically on the smaller wall in my kitchen to the left of the doorway into our den.  I used a dark chocolate linen as the background just to give the fans some definition and create some contrast with the light wall color.  You can see all the detail of the fans with this linen as a backdrop.


It's hard to see from these photos (b/c I stink at taking pictures), but the fans appear to be floating in the thick shadowbox frames.

You can see this detail a bit better in the picture below.

This was a super easy and quick project, and I took pictures every step of the way.  So, I will be sharing a little tutorial with you next this week on how to make some of your very own.  Cheers. M.

PS: any tips on photographing a dark room with zero natural light is much appreciated!