Showing posts with label Design Projects. Show all posts

Finished Project - Master Bedroom

I did an installation this week of a master bedroom project I've been working on since the summer.  

We had actually completed everything except the drapery panels which were on backorder for several months.  Sometimes those kinds of things happen, so you just have to be patient and go with it.  

The panels were a great deal, so we waited it out.  Once the panels arrived(Woo Hoo!),  I added the tape detail to them. (I'm going to show you a step by step tutorial on how I did it next week, so stay tuned). 
 Adding this kind of detail to ready made panels is a great way to achieve a custom high end look for less.  

Most of the furnishings the client already had in their home.

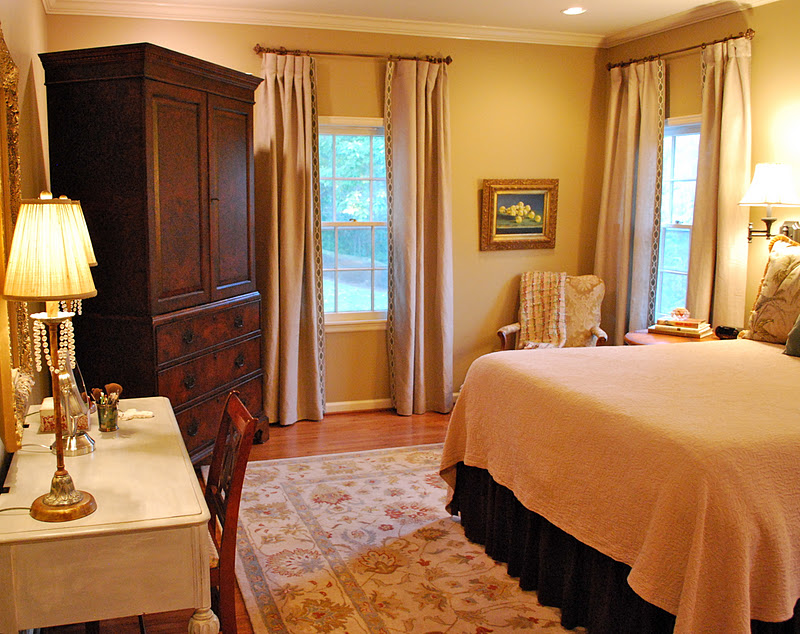
We just freshened it up a bit by adding new pillows, drapery panels with custom trim, an affordable etagere, swing arm lamps, an upholstered bench (also a great price from Overstock), and a vanity which my client found at a second hand shop for a true steal of a deal!

Here's a close up of the pillows.  That velvet pillow is such a rich color in person, these pictures do not do it justice!

See the vanity to the left.  The lamps were in her dining, so we switched them out with lamps that were previously on her bedside tables.  Such a pretty place to get ready in the mornings. 

Sorry some of these are blurry!  I just snapped a few to give you an idea.

All the other pieces you see are from other rooms in the home.  It's amazing how moving accessories around can make a room feel fresh.  

The client had this pretty silver tray stored in her buffet in the dining room.  I thought it made the perfect place for the remote and her husband's reading glasses.  There are ways to make the practical look great!

 This artwork was in the dining room.  Remember, there is no rule that says fruit has to stay in the kitchen or dining room.  The greenish yellow of the fruit actually picks of the color of the trim detail on the velvet pillow.  

This bench is a wonderful place to put your shoes on in the morning.  It's right outside the bathroom, so it works! 

There was simply no room for a side table by this reading chair (trust me I tried every single table in the house), so we opted for a basket of magazines. 

We are going to be freshening up some additional rooms over the next year, so stay tuned!  I'll try to remember to snap a few before shots next time! M.  

Redesign - Vestavia Home

I thought you might like to see what I've been doing with my time lately.  This is a redesign I've been working on for a incredibly fun client in Vestavia, Alabama.  For redesigns, I take a client's current furnishings, and completely rearrange each room.  I move pieces from room to room, rehang artwork in new and fresh groupings, and totally restyle all accessories in the space.

 When I finish, the client has a brand new space.  Short of painting, redesigns are the most affordable way to achieve a new look in your home.  Once I complete the process,  I like to make suggestions on new pieces to enhance the space.  No more anxiety over wondering whether a piece of furniture you find will actually work in your space.   You will know exactly what to look for when you're out shopping.      

This is the first thing you see when you enter the front door.  This space had several small pieces - a chair, small round table and several items hanging on the wall.  I took a less is more approach and selected one large scale table, with a custom pleated skirt.  This table is the only new furnishing  purchased by the homeowner for this entire redesign.  All the other furnishings they already had in different rooms of their home.


Here's a close up of the tape we included on the bottom for interest.


And we topped it off with a custom aged mirror top for some sparkle and glamour.  I then added a bowl of pumpkins for the season.  All the other accessories, the homeowner already had in other rooms of her home.


This family lives in every single room of their home.  This is one of their main living spaces.


The doors to the left lead to a screened porch while the doorway to the right leads to the kitchen and den.  The parsons chairs flanking the chest were originally in the dining room, the artwork was over the mantle and the olive jars were in the bookshelves. 

The client has an amazing collection of olive jars, so I highlighted a pair of them here.  

This view is looking back towards the front door.  I moved the low console table in from her master bedroom.  Originally, there was a large asian inspired armoire on this wall.  I think the console gives the space a more open feel while the artwork grounds the wall and gives it impact.   Also, love the large artwork on the wall leading into this space. 

Here's a close up of the bookshelves to the left of the fireplace.

The console had crystal knobs giving it a bedroom feel, so we changed them out for these brass pulls - simple change but lots of impact. 

And last, but not least - this photograph of their spunky dog, Chet.  He's so adorable!

I have pictures from other rooms, but I am out of time for today!  I promise to share more soon. M.

PS: Blogger has not been cooperating with me on my giveaway.  Thanks for the emails about this.  I will try to fix the problem today on being able to leave a comment on the giveaway page.  If any of you bloggers out there have a trick, I would love to hear it!  

Kitchen Project

Thought you might like to see a kitchen design I just completed for a first time homeowner.  The kitchen is not huge.  So, I wanted to lighten up the space to achieve a more open airy feel.      

Here's the visual design board for the project. . . 

My goal with this plan is to work with the current layout and simply freshen up the space with new materials.  The kitchen has old fashioned knotty pine cabinetry (in a honey stained finish) and lemon yellow laminate countertops (not kidding).  We will change out the countertops; but rather than start over with the cabinetry (which can be very expensive), we are going to whitewash them.  I think it will give the kitchen so much character.

As with most of my design plans, I give my clients all the resources they need to complete the plan.  Then I'm here to help as they need it.  Some want me to handle all the details while other clients want to take the plan and implement it on their own.  Hopefully, this client will send me pictures of the competed project!  M.

PS: Don't forget about the giveaway I'm hosting.  I'm giving away one framed grouping of intaglios.  The deadline for entering is Sunday, October 16th.

Click Here to Enter the Giveaway

Enjoy your day! M.

Project in Progress - Master Bathroom

One of the projects I have been working on is a total renovation of a home in Mountain Brook.  For those not familiar with Birmingham,  Mountain Brook is a city just outside of Birmingham.  It is a beautiful residential area with lots of great homes and mature landscaping - just lovely.

My clients purchased a home in foreclosure and have been renovating the entire space.  It has been such a fun project to be a part of and the new house is beginning to finally emerge.  Although we are far from the finish line, I thought I would share a small sneak peek of a few rooms.

Master Bathroom
In this shot you can see the other vanity area.  Really pretty layout. 

For the floors, we used large 18" square tiles and had them laid on the diagonal for a dramatic look.  They still need to grout the floors, but aren't they pretty!  

It's hard to see (since I am such a bad photographer), but the large tiles are polished and the small accent tiles are a tumbled finish.  This contrast really adds a lot to the look.
Here's a tip:  the floor tiles are porcelain (not marble)!  But we selected one that has the same look.  We saved quite a bit of money by doing this, which can then be invested in the free standing tub and the marble countertops on the vanity.  You have to know where to save and where to splurge to make this work! 

A few pictures of other rooms.

Master Bedroom
 You can easily see the wall where the bed will go.  The home has lots of light. 


Family Room
This rooms opens on to a back terrace.  Very elegant.

Breakfast Room
This is the breakfast room which opens to the kitchen and out onto the terrace to the right.  It has such a beautiful view of the back yard.  The ceiling is a high cupola with beam work.

I will share the final results when we get there!! It will take a while, but will be totally worth it. M.

Project in Progress - Stairwell Lighting

So, yesterday I gave you a run down on my thoughts on stairwell lighting.  I mentioned I was working on lighting for a client's renovation.  
I thought you might like to see what we selected for her stairwells.

Since we were dealing with stairwells that were dark and a bit narrow, we decided to go with wall sconces.  I first found this fixture and thought it would work perfectly in the space.  It's the right style and has a really low profile.  It's also simple with a current look.

These are $265 each and we needed 6 of them (three for each stairwell).  So, we're talking around $1,600.00 for lighting.  These are beautiful with leather detailing, but our goal was to provide light with low profile simple sconces, not make a statement with the lighting (or the price). 

So, in comes one of my favorite lighting resources, Lamps Plus.  You have to dig a bit, but you can find some amazing deals.  Here's the look-a-like we ended up going with for her project.
These are $60.99 each. So, a total of  $365.94 for all the stairwell lighting!  The key element - same exact profile measurements (juts out only 4" from the wall).  Man, I love a good deal!! 

Btw, it also comes in a double light if you are looking for a brighter fixture.

I hope you have a great weekend.  We are having some wonderful weather here in Birmingham, and the count down has begun for the last day of school - only one week left!  We will be out enjoying our weekend.  I hope you do the same. M.

Project in Progress - Big Girl Room

Just wanted to share a project I'm working on for a client.  She read the posts I did on a Bedroom Freshen Up and Playroom Dreaming and wanted me to do the same for her daughter's room!  

Here's the story - She's moving her daughter out of the crib into a real bed and wants to give the room a big girl look without breaking the bank.  For starters, she already has the bed which is a lovely amber colored spool bed (sorry I don't have a picture, but take my word for it, it's lovely).  She also has a bedside table in a similar tone of wood.  In addition to the bed, she has roman shades (left from the previous homeowner) in a pink window pane fabric that is trimmed in a thin green tape. (I have encouraged her to use these since they are in great shape and since pink is the color of the year!)


She also has a simple matelasse coverlet and bedskirt in white.  So, a basic start to a room!  Also, I will tell you that my client is young and hip and wants something unexpected, maybe even a bit sophisticated for this space.  The main reason is this room also acts as the guest bedroom when family and friends come to town, so it needs to play double duty.  Lastly, she is on a tight budget for this "freshen up" so every single dollar must add tons of impact.  The goal was to keep it around $350.00.

OK, so that is what I started with and here are two options I have given her for the room.  Why Two? Because a girl needs options (and because I simply cannot help myself when I start working on these projects!)

Option #1 is just a bit more expensive at a grand total of $345.44.  


Option 2 has a brighter, bolder feel, but would also make a fun big girl room.  
The grand total for this "freshen up"- $322.49.


I would love to know which you prefer!  It might help her make a decision.  M.


A Bathroom to Share

I recently purchased this vanity bench for my daughter's bathroom, and I'm loving how it looks.   Kim over at Green Room Interiors has a fantastic eye.  She found this little bench, painted it and reupholstered it in this great fabric.
When I saw it in her shop, I knew it would look amazing in the space.
My daughter shares this bath with our guest bedroom, so I wanted to make it a bit more sophisticated and this vanity bench is definitely a step in the right direction.

It fits perfectly in the built in vanity area.  The fabric is a linen with gray, green and teal (which is my daughter's favorite color) accents.  What I like about the fabric is that it is whimsical enough for my eight year old, but the colors are "grown up" enough for a guest bathroom.  Thanks, Kim!
  

This little vanity bench is only the beginning for this bathroom.  I have big big plans in there, but I must pace myself.  If you recall awhile back, I posted on some great affordable artwork.  This is the piece I had framed for the space.

I would love to get one more from this series so I can stack them vertically on this wall.  Then I will paint a dramatic color on the wall, so the large mat of the artwork draws your eye into the small watercolor.

Now that I have a couple of pieces for inspiration, I can begin to make this bathroom something special. 

Stay tuned. . . .  

Redesign

I think so many people underestimate the impact of re-arranging their furnishings.  By using what you have in new and different ways you can really freshen up a space.  

This week, my business partner and I did a redesign for a wonderful homeowner who calls us every season to "freshen up" her spaces.  We move furnishings around and rotate/edit accessories depending on the season.  Here are some pictures of the results!  Thanks Sherry for continuing to call us.  We love working with all your beautiful accessories. 


If you live in Birmingham, AL and want a fresh new look for Spring, call us!  We can do the same thing for you.  M.